
Marble painting is a fun and easy craft that makes a unique painting each time.
The great thing is that you don't need great fine motor skills, you don't need any artistic ability -- and best of all, there's no wrong way to do it!
The only thing marble painting is not good for is use with children under age 3, as the marbles can present a choking hazard.
Here's how to use a simple template and red, white, and yellow paint to create a fun and colorful wall hanging.
More Crafts & Activities for Kids
- How to Make Puffy Paint Without Shaving Cream
- Dinosaur Footprints Cookie Recipes
- How to Make Dinosaur Dirt Pudding Cups
- How to Make a Toilet Paper Roll Bird Feeder
- Animal-Themed Party Food Ideas
What is marble painting?
It's painting with marbles.
Basically, you put paint-covered marbles in a box, then shake and roll them around.
Not only do you end up with a cool look that is completely unique each time you do it, but there are literally no "mistakes" or "not coming out right."
In a sense, the marble does the painting for you, and it's impossible for it to not do a good job!
What skills are in marble painting
Doing a marble painting requires fine motor skills -- specifically, hand strength, bilateral coordination, and visual tracking.
Kids need to use their hands to tilt the box in a [somewhat] strategic way to the marble travels all over the paper.
The free Mickey Mouse template for this craft is in my Resource Library.
If you don't already have the super-secret password to get access to all the free printables and templates in there, just fill out the form below:

Materials Needed for this Craft:
- Mickey Mouse Template (in my Resource Library; see above)
- Black Cardstock
- White Cardstock
- 3 Marbles
- Acrylic Craft Paint:
- Red
- Black
- White
- Yellow
- Craft Paint Brush
- Plastic Spoon
- Painters Tape or Masking Tape
- 3 small jars or cups (we used recycled baby food jars)
- Cardboard box large enough to put the cardstock inside it

Marble Painting Directions:
- Print your Mickey Mouse template onto a sheet of white cardstock.
- Cut out the Mickey template.
- Fold small pieces of painters tape backwards into a loop, so that the adhesive side is facing outwards.

- Attach along the outside edges of the Mickey Mouse template.

- Tape the template to the middle of your black cardstock.

- Use the black acrylic paint and your paint brush to paint only the outside edges of your Mickey Mouse template. (This keeps the other colors of paint from bleeding through under the template.)

- Continue painting all around the edges.

- Once the black paint is dry, flip the black cardstock over, and attach 4 pieces of painters tape to the four corners.

- Press the black cardstock into the middle of your cardboard box, making sure to press the corners down so the painters tape sticks to the box. (This keeps your picture from moving around when you slide the marbles from side to side in the box.)

- Add the white, yellow, and red acrylic paint to your three separate jars or cups. Add one marble to each jar.

- Using the plastic spoon, stir the marble around until it is covered with paint.

- Use the spoon to drop the paint-covered marble anywhere on your black cardstock.

- Pick up and tilt the box in order to get the marble to create streaks of paint across your template.

- Put the marble back into the jar with the spoon to get more paint, and repeat the process over and over until you're happy with the amount of paint on your cardstock.

- Repeat this step with the yellow paint ...


- And the white paint.


- Once you're finished marble painting, carefully remove the cardstock from the box.
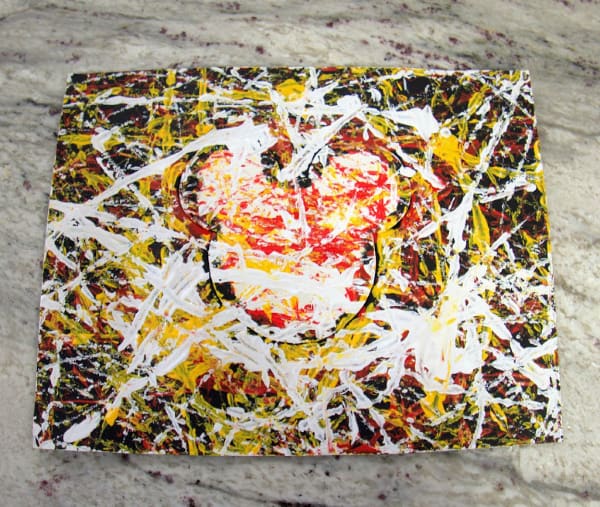
- Slowly remove the Mickey Mouse white cardstock template from your black cardstock. You should be able to clearly see the Mickey Mouse shape on your black cardstock.

- To get more bang for your buck, save your Mickey Mouse marbled template. You can attach it to another piece of cardstock and create an additional piece of art.

- Let it dry completely, and enjoy your painting!


Mickey Mouse Marble Painting
Materials
- Black & white cardstock
- 3 marbles
- Acrylic paints in red, black, white, & yellow
- 3 small cups
- Cardboard box
- Plastic spoon
Tools
- Craft paintbrush
- Painters or masking tape
Instructions
- Print your Mickey Mouse template onto a sheet of white cardstock and cut it out.
- Use loops of painters tape to attach the template to the middle of your black cardstock.
- Use the black acrylic paint and your paint brush to paint only the outside edges of your Mickey Mouse template. (This keeps the other colors from bleeding through.)
- Once the black paint is dry, flip the black cardstock over, and attach 4 pieces of painters tape to the four corners.
- Press the black cardstock into the middle of your cardboard box, making sure to press the corners down so the painters tape sticks to the box.
- Add the white, yellow, and red acrylic paint to your three separate jars or cups. Add one marble to each jar.
- Use the plastic spoon to stir the marble around until it is covered with paint.
- Use the spoon to drop the paint-covered marble anywhere on your black cardstock, then pick up and tilt the box in order to get the marble to create streaks of paint across your template.
- Put the marble back into the jar with the spoon to get more paint, and repeat the process over and over until you’re happy with the amount of paint on your cardstock.
- Repeat this same process with the other marbles.
- Put the marble back into the jar with the spoon to get more paint, and repeat the process over and over until you’re happy with the amount of paint on your cardstock.
- Let it dry completely, then hang it up and enjoy!
Notes
This is NOT a good activities for toddlers because the marble could be a choking hazard.
Recommended Products
As an Amazon Associate and member of other affiliate programs, I earn from qualifying purchases.


Leave a Reply